Today I am going to explain step-by-step how to build a photo booth from PVC pipe. Before building my photo booth for Hometown Halloween I did a ton of Pinterest, DIY blog and online research but I still couldn’t find any real step-by-step guides or lists of supplies. However, I complied a few popular designs and reinforced them with my own structural ideas so it would stand up against The Great Oklahoma Wind. (I also used 4- 20 pound sand bags to weight it down.)
To build your own PVC pipe photo booth frame:
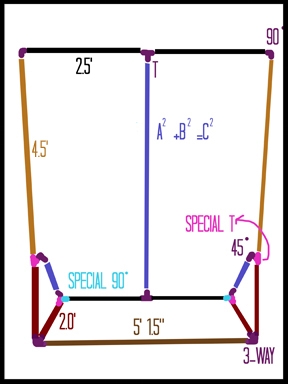
How big do you want your photo booth to be? More appropriately asked, how tall will your subjects be? Small groups or larger groups? This will help you determine your size. I wanted something around 5 ft wide and 6.5ft tall.
Do the math! I’m not a pro at math… and I know my algebra teacher insisted I WOULD need “this” someday but a lot of life has happened between the 8th grade and now. So we are going to do this the easy way!
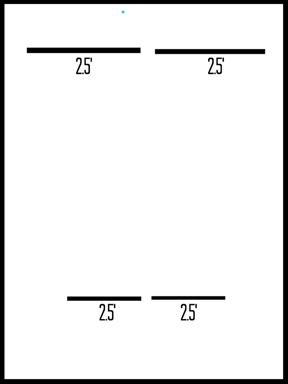
Take your width and divide in 1/2.
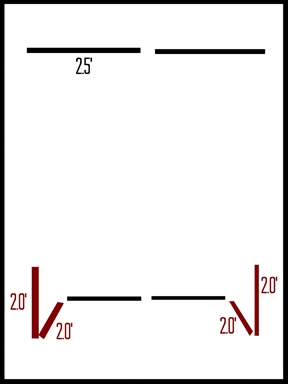
You’ll need 4 qty, 2 ft sections on the lower part of the height and depth. My Photo Booth could only be 2 ft deep, these could be deeper but the depth and the height of your lower section needs to be the same.
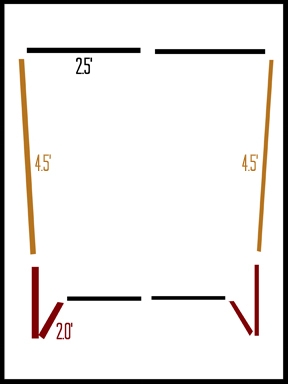
If the lower height is 2 ft tall and I want a photo booth that’s at least 6.5 ft tall, then my upper section needs to be 4.5 ft tall.

Your front PVC pipe section will be a little longer than the 2.5 ft sections, because of the T fitting that will go between the two 2.5 ft sections. (I personally put the two 2.5 ft sections together with the T fitting and then measured how long the brown front PVC section needed to be. The fitting measures about 1.5 in.)
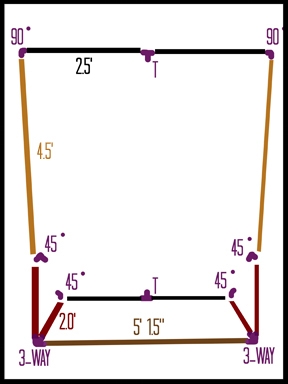
Let’s talk about PVC Fittings. You will need some normal fittings and some special fittings. The purple blobs are the normal fittings you’ll need. 2 qty 3-Way fittings, 2 qty 90 degree fittings, 2 qty T fittings and 4 qty 45 degree fittings.
(These will also be in the final supplies list later.)
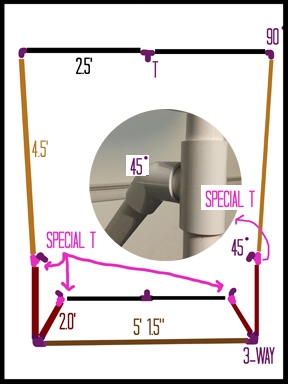
Now the special PVC fittings are smaller at one end and normal on other ends. In the above step the “Special T” needs to fit inside the 45 degree fitting, so that end must be a little smaller.
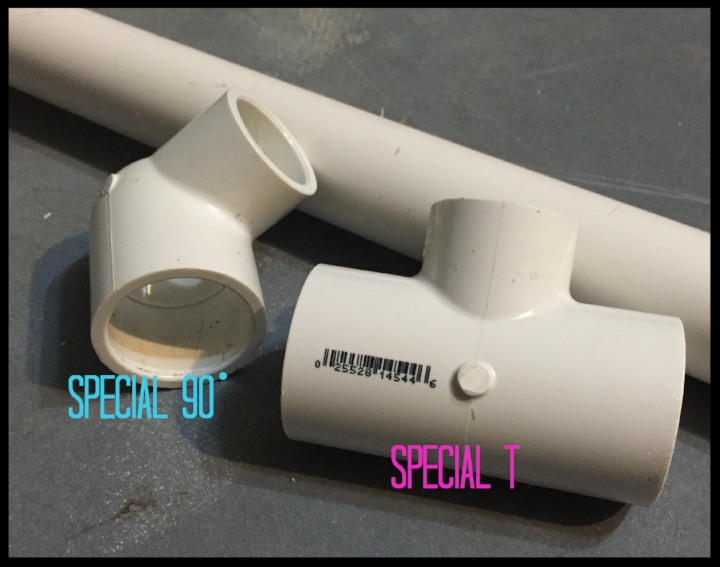
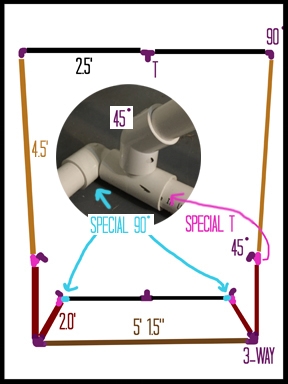
To complete the bottom fitting sections, you’ll need a special 90 degree fitting that fits into a special T fitting that fits into a normal 45 degree fitting.
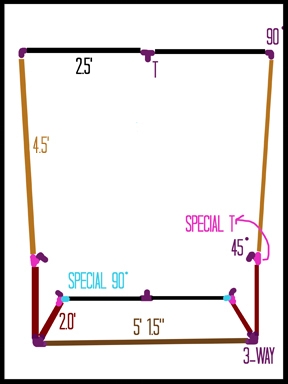
So now you have this. The most complicated part is over, figuring out all the fittings, and the easiest part is about to begin. All that is left is making the front secure to the back.
This is the easy part, I promise! I know there’s a mathematical equation that my 8th grade algebra taught me that could solve this but I cheated. Once all these sections of PVC are cut and all the fittings are put together, JUST MEASURE. That’s right, I measured from one fitting to the next and cut my pipe.
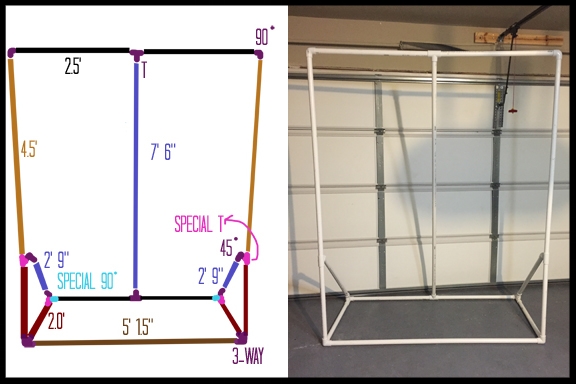
There it is ladies and gentlemen, a PVC pipe photo booth frame!
You will be able to find all your supplies at your local home improvement store down the isle with the PVC pipe.
Shopping List:
- 2 Qty : 1 inch Tee
- Normal T
- 4 Qty : 1 inch x 1 inch x 3/4 inch 90 degree Tee
- Special T
- 2 Qty : 1 inch 90 degree elbow
- Normal 90 degree
- 2 Qty : 1 inch x 3/4 inch 90 degree elbow
- Special 90 degree
- 2 Qty : 1 inch side outlet elbow
- Normal 3-Way
- 4 Qty : 1 inch 45 degree elbow
- Normal 45 degree
- 50 feet : 1 inch SCH 40 PVC pipe
- My home improvement store sold the PVC in 10 foot sections which was the most economical.
Cost: $34.70 (less tax and supplies)
Supplies List:
- Sharpie
- Measuring tape
- Small saw, something to cut the PVC with
- Use caution and take appropriate safety measures then cutting the PVC. It’s fairly easy to cut but don’t cut yourself!
I used the SCH 40 pipe because it seemed to be the perfect type between cost and durability. I also used the 1 inch pipe because it has all the fittings I needed. If you choose to go with thinner or thicker pipe you might have a hard time finding all the fittings that are needed to create the angles I did.
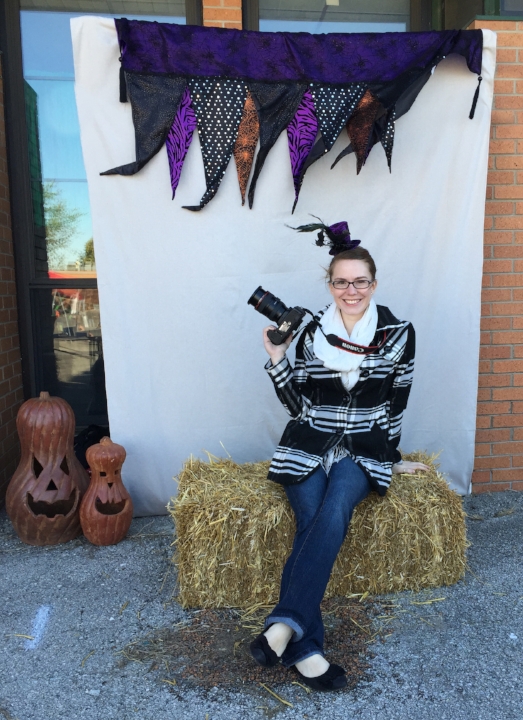
NEXT? Hang a backdrop and have FUN!
(Click here to see my blog on the Hometown Halloween event, in Catoosa, when I used this backdrop.)
-Amanda Hitchen

I’m working with a pvc pipe backdrop that has multiple t brackets at the top due to its size. Can you tell me how you attached your fabric with a bracket in the middle?
Hey Erica, great question!
When I hung my backdrop for this frame, I pulled the fabric over top of the PVC pipe to the back and used a clamp to hold the fabric to the PVC pipe on the backside. I purchased some clamps for a few dollars a piece from a local hardware store, in my case Lowe’s. It takes some muscle to open the clamps enough to pull the fabric and the PVC pipe into the clamp. Doing it around a T-piece; I would put a clamp on one side of the T-piece and on the other side of the T-piece so that the fabric on the front side is smooth.
Hey! I love this perfect layout, thank you. Were you able to put the pieces together so they can come apart and put back up when needed or did you glue them in place so it’s always built? I’d love to have a backdrop I can put together as needed for parties then store torn down if possible but didn’t know if that was possible with one this large.
Great question Taylor!
You are so welcome!!! I am glad that you like it. 🙂 I didn’t have to glue them, which is the best part! I can set it up and break it down multiple times without having to glue it. When I set it up I make sure all the fittings are together firmly and then twist the PVC pipes in the fittings to loosen them out. So yes, it is absolutely possible with one this large! Have fun creating your own backdrop and let me know if you have more questions. 🙂
[…] P.S. Want to build a photobooth like mine? Click here for step-by-step directions. […]